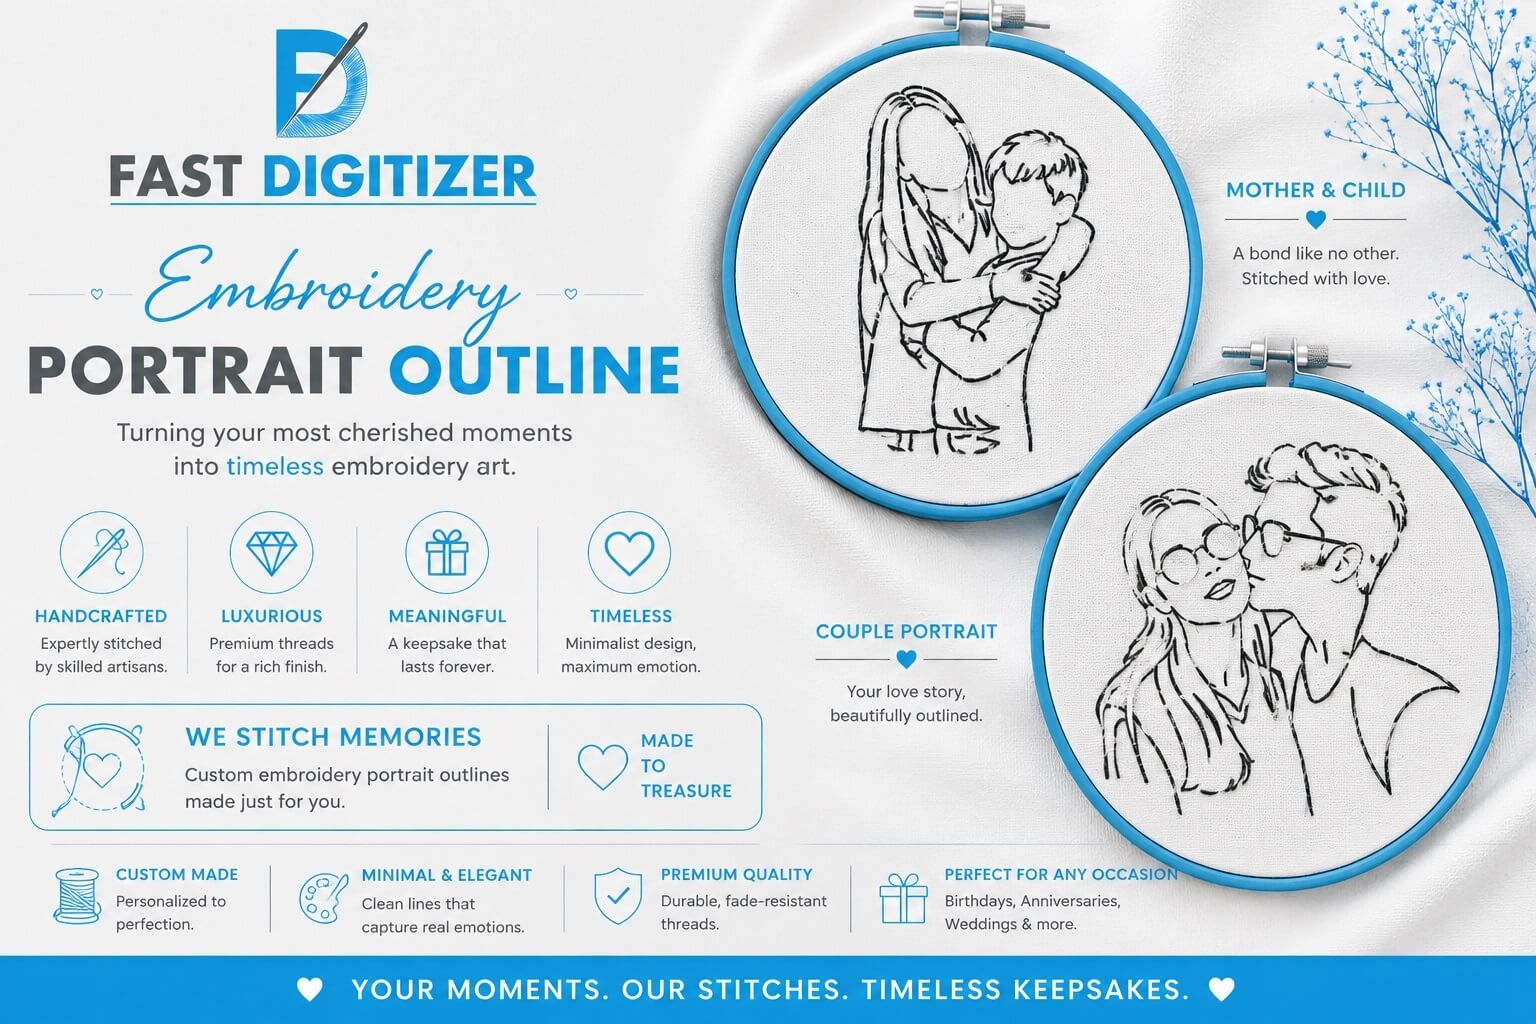
An embroidery portrait outline turns a face, a pet or a couple into a handful of clean lines that a machine can stitch. No shading, no photo realism, no thousands of colour changes. Just the shapes your eye needs to recognise the subject. Done well, an embroidery portrait outline reads instantly from across a room and still looks calm up close.
Quick answer
An embroidery portrait outline is a line-only design traced from a photo. A digitizer keeps the silhouette plus a few defining features, then stitches them as running, bean or satin lines. Stitch counts stay low, the garment stays soft, and the viewer’s brain fills in everything you left out.
What Is an Embroidery Portrait Outline?
Think of it as drawing with thread instead of painting with it. A photo portrait might need forty thousand stitches and twelve thread colours. The same subject as a line drawing might need three thousand stitches and one colour, yet people still recognise the face.
An embroidery portrait outline suits gifts, wedding keepsakes, pet memorials and small brand merch. It also survives real life better than a dense photo fill, because a light design does not stiffen the garment or pucker the fabric around it.
Why Fewer Lines Stitch Better
Every embroidery portrait outline runs into the same wall: thread has a minimum thickness. That single fact drives everything. Two lines drawn a hair apart on screen will touch once they become stitches, and the gap between them disappears into a smudge.
So detail that looks precise in the artwork often turns to mush on fabric. Hair strands merge. Eyelashes close up into a dark blob. Skin shading becomes a grey patch. The fix is not better stitching. The fix is fewer lines in the first place.
There is a useful rule of thumb here: your brain fills in the rest. You do not need every whisker to know it is a cat. If a line does not change whether someone recognises the subject, it is costing you stitches and buying nothing.
What To Trace And What To Leave Out
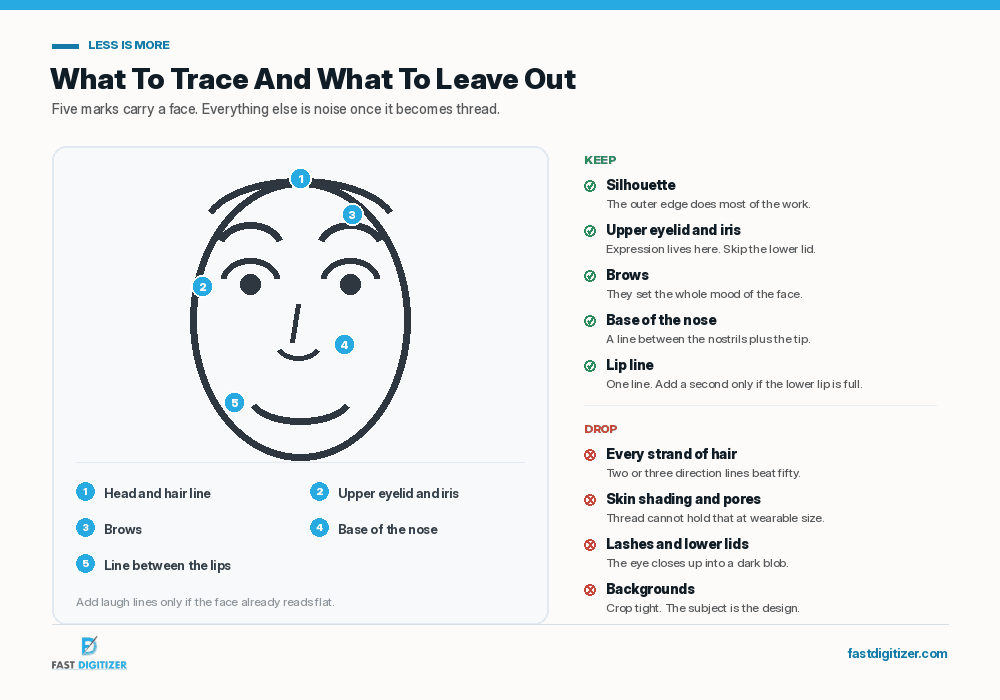
Five marks carry most faces. Build your embroidery portrait outline from the silhouette first, since the outer edge does the heaviest lifting. Then add the hair line, the upper eyelid with the iris, the brows, the base of the nose and the line between the lips.
Notice what is missing from that list. Lower eyelids and lashes are out, because they crowd the eye and close it up. Skin texture is out. Backgrounds are out, so crop tight and let the subject be the whole design.
Laugh lines are the one judgement call. They add age and character, which is sometimes exactly what you want and sometimes not. Add them last, look at the result small, and remove them if the face already reads well.
Which Stitch To Use For The Line
Machine embroidery gives you three main stitch types. Running stitch draws lines and travels between sections, satin stitch covers narrow dense shapes and lettering, and tatami or fill stitch handles large areas. An embroidery portrait outline lives almost entirely in the first two.
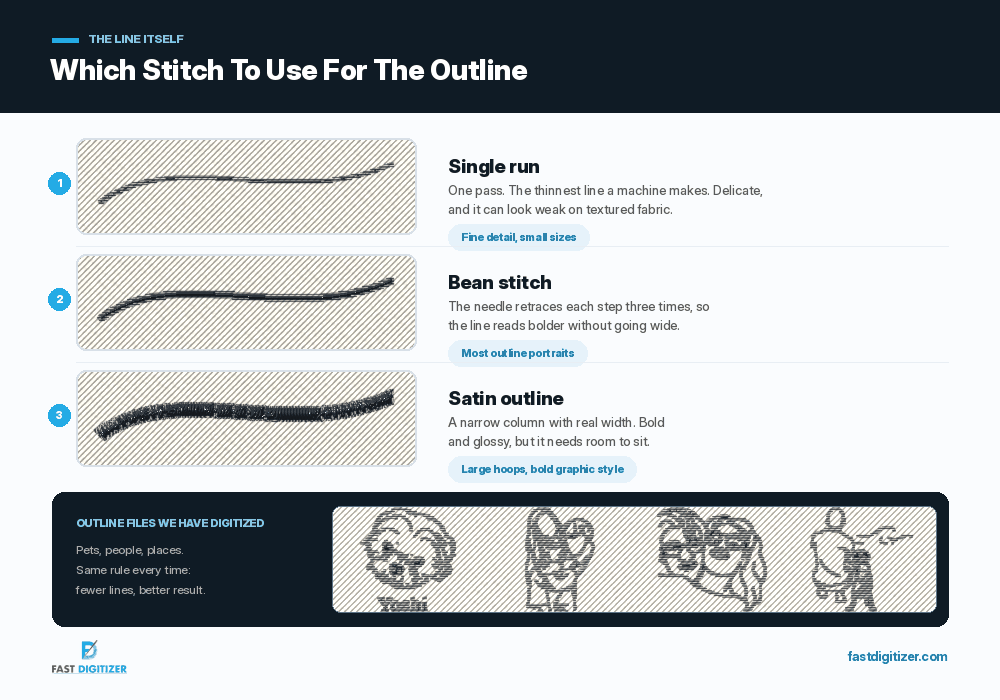
A single run is the thinnest line a machine makes. It suits fine internal detail, although it can look weak on textured fabric like fleece or knit. A bean stitch retraces each step, usually three times, so the line reads bolder without getting wider. Most portrait outlines use bean stitch as their workhorse.
A satin outline gives real width and a glossy finish. It looks bold and graphic, but it needs room, so it works better on large hoopings than on a small left chest. You can read more about the three basic machine stitch types on the Wikipedia machine embroidery page.
Choosing The Right Photo To Start From
Every embroidery portrait outline starts with a source photo, and good ones share a few traits. Strong, even lighting beats a moody shot every time, because shadows hide the edges a digitizer needs to trace. Sharp focus matters more than resolution, since a crisp small photo beats a huge blurry one.
Face the camera, or nearly. Extreme angles hide half the features you were planning to keep. Avoid busy backgrounds too, and avoid sunglasses unless you actually want them in the design.
If your artwork is a photo rather than line art, the conversion is a separate job with its own decisions. Our guide on how to turn a photo into an embroidery pattern covers the fuller colour approaches, and our note on digitizing images for embroidery explains what makes a file easy to work from.
Where These Designs Work Best
Stable woven fabrics give the cleanest lines. Cotton, twill, canvas and denim all hold thin stitching without distorting. Sweatshirt fleece and knit tees work too, though they usually need cut away backing and sometimes a topper so the line does not sink into the pile.
Colour choice matters more than people expect. Because an embroidery portrait outline is nothing but line work, contrast is the only thing carrying it. A dark thread on a light garment or a light thread on a dark garment reads well. Mid tone on mid tone disappears.
Tote bags, aprons, caps, hoop art and framed keepsakes all suit the style. Caps need extra care because of the seam and the curve, so keep the design narrow and centred there.
Getting Your Embroidery Portrait Outline Digitized
Auto tracing is where most attempts fall apart. Edge detection software finds every edge, including the ones you did not want, so the output arrives cluttered and needs more cleanup than starting fresh would have taken.
Manual digitizing works differently. A digitizer building an embroidery portrait outline decides which lines survive, sets the stitch type for each one, plans the sequence so travel stays hidden, and adds lock stitches so nothing unravels. That editing judgement is the actual product, not the tracing.
Tell us the finished size and the garment when you send the photo. Both change the decisions, because a design that works at seven inches on a jacket back needs simplifying at three and a half inches on a left chest. The same principle applies whenever we digitize a logo for embroidery.
What It Costs
The price of an embroidery portrait outline follows how many separate elements survive the edit and how large the design runs, not how complicated the original photo looked. A single pet head costs less than a family group with four faces.
At Fast Digitizer, digitizing starts at $9 and turnaround is ASAP. You receive the file in the format your machine needs, plus a worksheet with the stitch count, the recommended thread and the finished size. Our custom embroidery digitizing options cover applique, puff and chain stitch versions of the same artwork.
Have a photo in mind?
Send it over with the finished size and the garment. We will tell you honestly whether it suits an outline.
Frequently Asked Questions
What embroidery stitch is best for outlines?
On a machine, bean stitch suits most outline work because it reads bolder than a single run without adding width. Use a single run for fine internal detail and a satin column when you want a bold, glossy line. By hand, backstitch, stem stitch, split stitch and chain stitch all make good outlines, and split stitch is the usual choice under a satin edge.
Should I outline first or last when embroidering?
Stitchers genuinely disagree, and both orders work. If your outline sits next to a filled area, running it last usually looks cleaner, since the outline covers any uneven fill edge and the fill cannot snag it. If you want a guide to stitch inside, outline first instead.
Can ChatGPT digitize images for embroidery?
No. A chat assistant can tidy artwork or describe the process, but it cannot output a machine file such as DST or PES. Digitizing means building stitch objects with density, underlay, pull compensation and a sewing sequence. Auto digitizing tools do exist inside embroidery software, though their output still needs manual correction before production.
What photo works best for a portrait outline?
A sharp, evenly lit photo taken close to head on. Crop tight so the subject fills the frame. Avoid heavy shadow, busy backgrounds and extreme angles, since all three hide the edges a digitizer needs to trace.
How small can an embroidery portrait outline go?
Around three and a half to four inches wide, the usual left chest size, a single face in an embroidery portrait outline still reads clearly. Below that the features start merging, so drop detail rather than shrinking it. Group portraits need considerably more room, because every extra face divides the available space.
Do I need permission to embroider someone’s photo?
For personal gifts, generally not. For anything you sell or advertise, be careful. The photographer usually owns copyright in the image, and the person in it may have publicity rights. Use your own photo, or get written permission, and never build merchandise around a celebrity or a brand logo.
About Fast Digitizer. We are an embroidery digitizing studio based in Chicago, building portrait, logo, applique and puff files for embroiderers across the United States. Our team digitizes every file by hand and delivers it with a production worksheet. See our full range of professional embroidery digitizing services or send your artwork for a free quote.