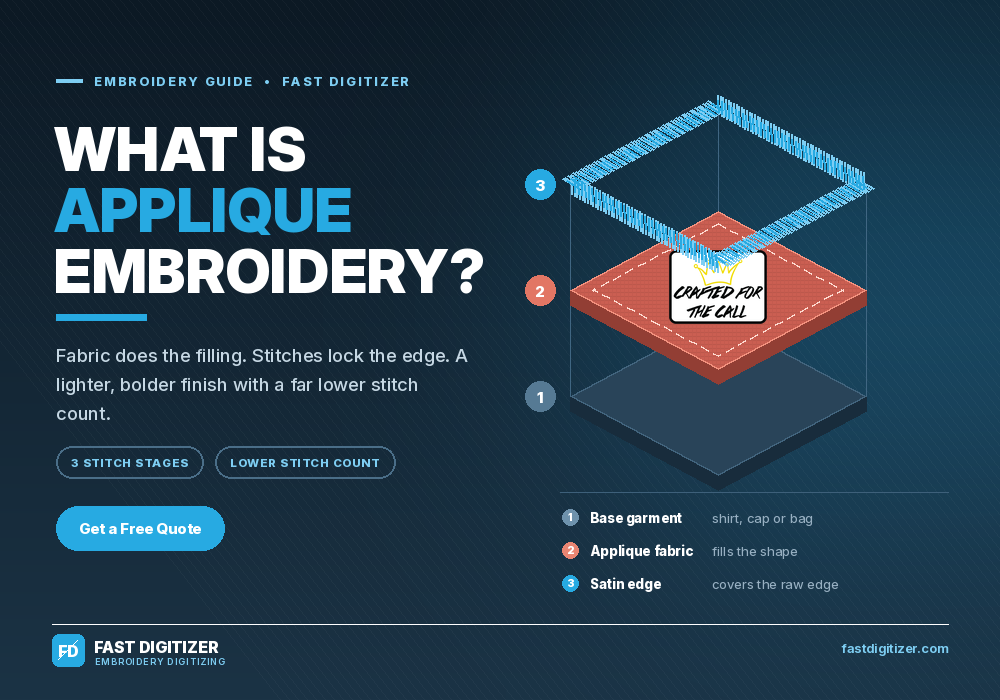
Applique embroidery is one of the fastest ways to put a bold, high contrast design on a shirt, a hoodie or a tote bag. Instead of filling every millimetre of the shape with thread, the machine lays a piece of fabric on the garment and stitches around its edge. As a result the design reads from across a room, feels lighter on the garment and runs in a fraction of the stitches.
Quick answer
Applique embroidery attaches a shaped piece of fabric to a base garment and locks the raw edge down with stitching. The fabric fills the design instead of thread. Therefore a large logo can cover a chest or a back panel with far fewer stitches than a solid fill.
What Is Applique Embroidery?
Applique embroidery is a decoration method where fabric shapes get stitched onto a larger base fabric to build the design. A satin, zigzag or blanket border then seals the cut edge so it cannot fray. In short, fabric does the colour work and thread does the outlining.
The word itself comes from the French verb appliquer, meaning to apply or attach, and the technique is far older than embroidery machines. Historically people used it to patch worn clothing before it turned into a decorative craft. You can read more about that background on the Wikipedia entry for applique.
Today most commercial work runs on a multi needle machine. However the same three stage logic applies whether you stitch by hand, on a home machine or on a sixteen head production line. Because the fabric carries the colour, applique suits big shapes, thick lettering and simple block logos best.
Applique Embroidery vs Standard Embroidery
Standard embroidery covers the whole shape with thread. Applique embroidery covers the same shape with fabric and stitches only the border. Consequently the stitch count drops sharply, the run time falls and the finished garment stays softer and more breathable.
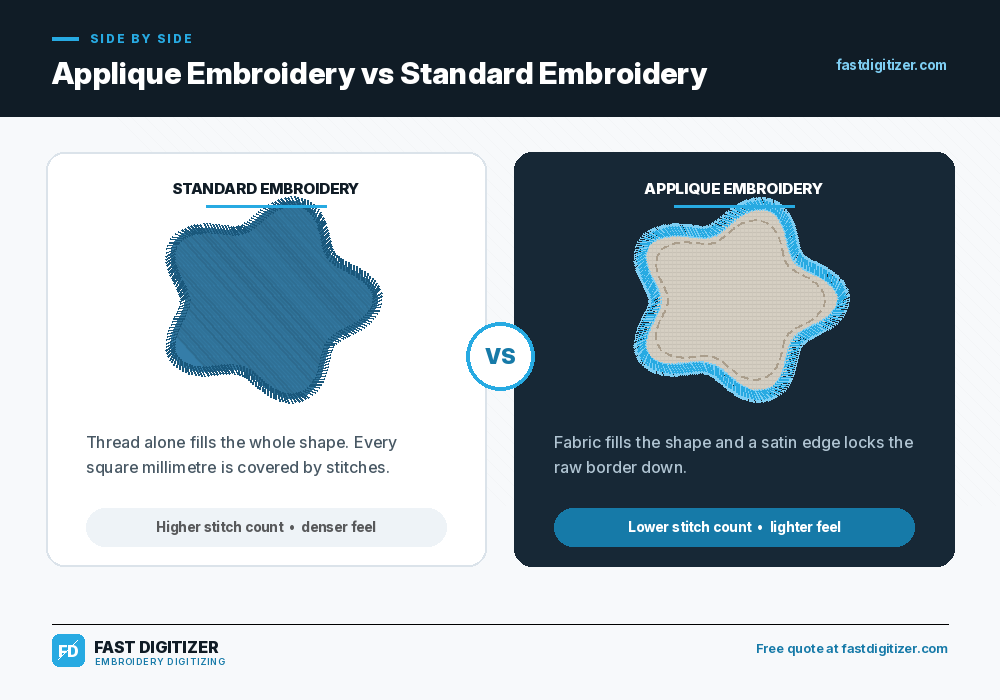
That difference matters most on large designs. A ten inch back logo in solid fill can climb into very high stitch counts, while the same logo in applique needs only a placement line, a tack down and a border. Therefore applique often wins on jackets, hoodies, team wear and tote bags.
Standard fill still wins on small, detailed artwork. Fine gradients, thin script and tiny lettering do not survive the trimming step. If your artwork sits in that category, a normal fill file is the safer route, and our guide on how to digitize a logo for embroidery walks through that process instead.
How the Applique Embroidery Stitch Sequence Works
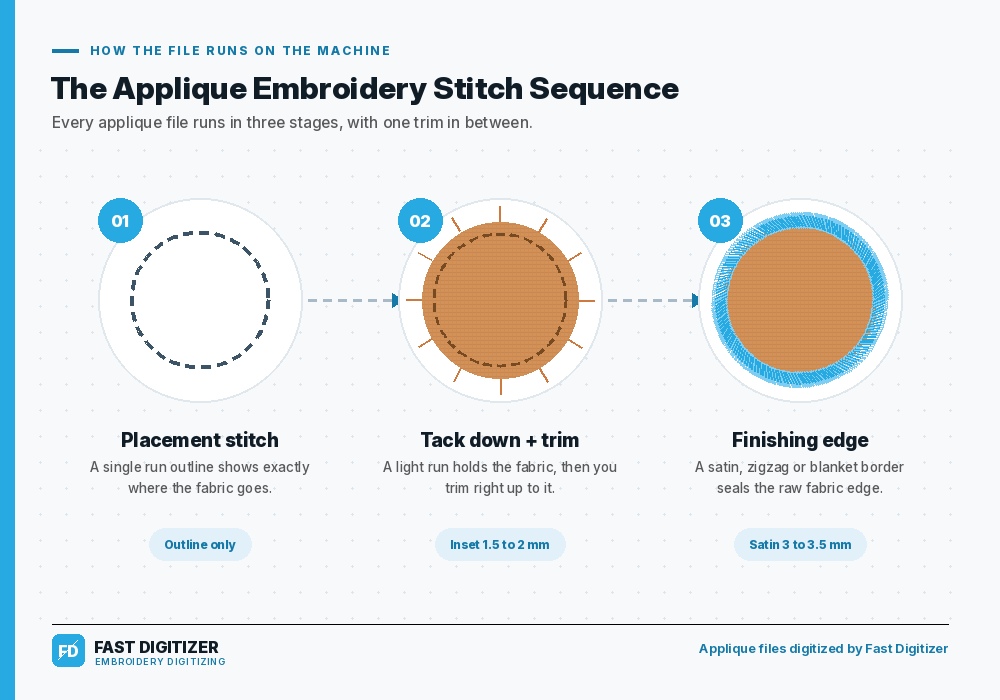
Every applique file runs in three stitch stages with one manual trim in between. First the machine marks the position. Next it holds the fabric down so you can cut it. Finally it covers the raw edge. Miss a stage and the fabric lifts, frays or shifts under the needle.
Stage one: the placement stitch
The machine sews a single run outline directly onto the hooped garment. This line shows the operator exactly where the fabric patch belongs. After it finishes, the machine pauses so someone can lay the fabric over the outline. Above all, keep the fabric slightly larger than the line on every side.
Stage two: the tack down and trim
A light run stitch then holds the fabric in place. This tack down usually sits about 1.5 to 2 mm inside the final edge. That gap matters. If the tack down sits too close to the border, the satin falls off the edge, and if it sits too far in, raw fabric pokes out past the stitching. Once it finishes, trim the excess with curved applique scissors, cutting as close to the stitch line as you safely can.
Stage three: the finishing edge
Now the machine covers the cut edge. Most commercial work uses a satin border around 3 to 3.5 mm wide, although zigzag and blanket stitches also work for a softer look. In addition, a good digitizer adds roughly 0.2 to 0.4 mm of pull compensation so no gap opens between the fabric and the border.
The Four Main Types of Applique Embroidery
The edge finish decides the whole personality of the piece. Some finishes look crisp and corporate. Others look soft and handmade. Choosing the right one before digitizing saves an expensive round of samples later.
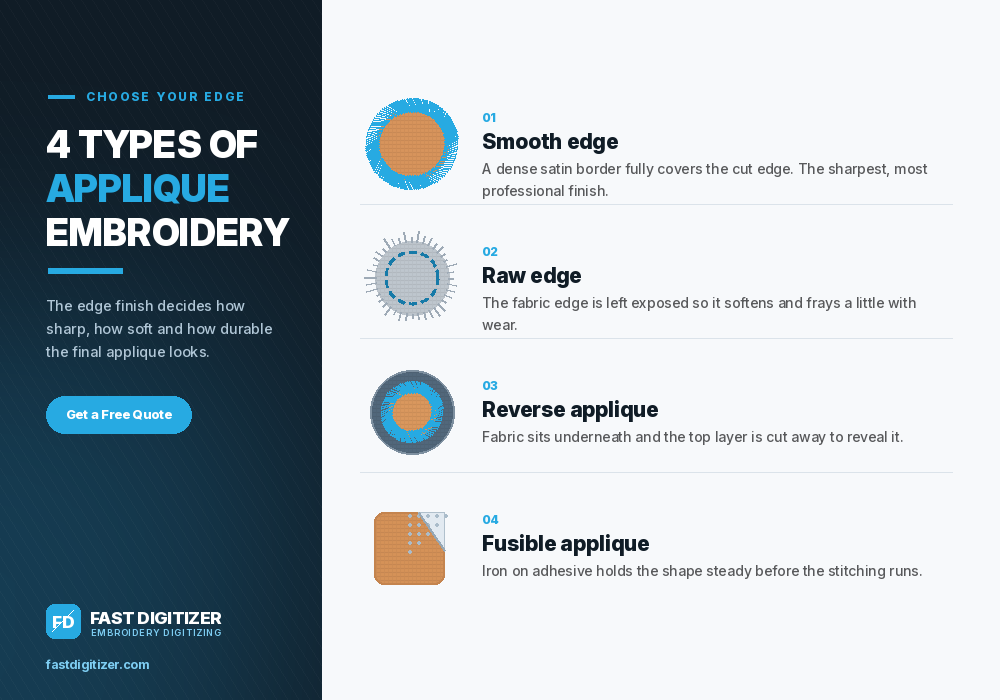
Smooth edge uses a dense satin border that completely covers the cut edge. It gives the sharpest, most professional result and it is the standard choice for corporate logos and uniforms.
Raw edge leaves the fabric edge exposed on purpose. A light run stitch holds it and the border softens with washing. Consequently it suits vintage, distressed and boutique styles rather than formal branding.
Reverse applique flips the idea. You layer the fabric underneath, then cut away part of the top layer so the colour below shows through. Because the trimming happens on the top surface, the finished piece feels slightly heavier.
Fusible applique uses an iron on adhesive web to bond the fabric before stitching. Although it adds a prep step, it stops the shape creeping during tack down, which is why it helps a lot with slippery fabrics.
Best Fabrics and Stabilizers for Machine Applique
Stable, tightly woven fabrics cut cleanly and hold their shape under the needle. Cotton twill, poly twill, felt and denim all perform well. Felt in particular does not fray at all, so it forgives a slightly rough trim.
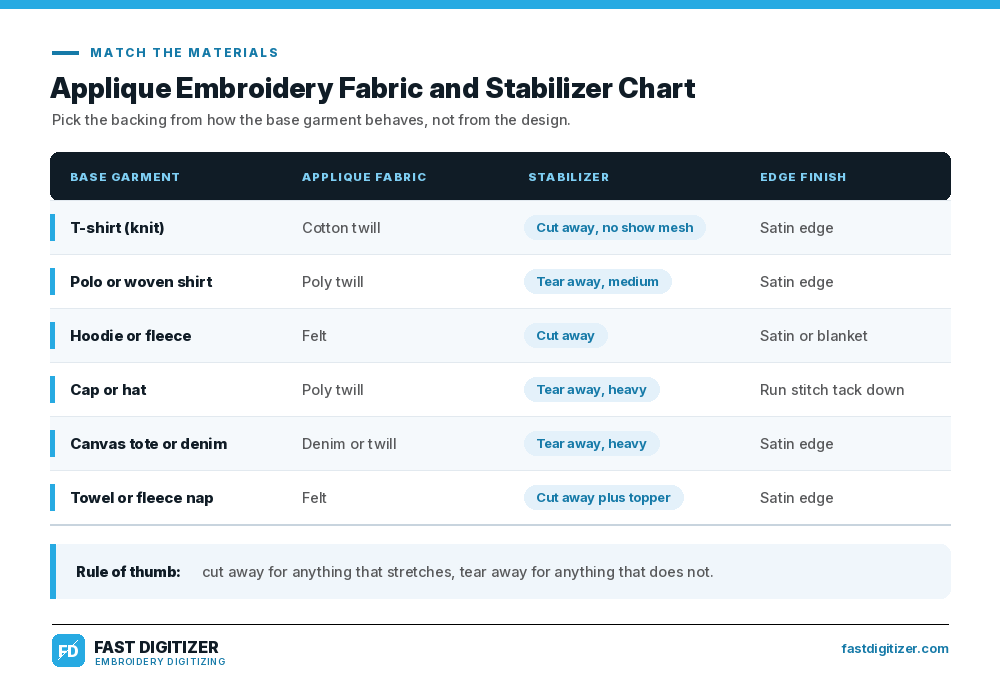
Stabilizer choice depends on the base garment rather than the design. Use cut away backing for anything that stretches, such as t shirts, polos and fleece. Use tear away for stable wovens like canvas, denim and structured caps. Meanwhile towels and other high nap items need cut away plus a water soluble topper so the satin border does not sink into the pile.
Avoid very stretchy or slippery fabric for the applique piece itself unless you stabilise it first. Otherwise the shape distorts during tack down and the border never lines up.
What Makes a Logo Work as Applique
Not every logo converts well. Bold shapes, closed outlines and thick lettering translate cleanly. Thin script, fine detail and photographic shading do not, because you simply cannot trim fabric that precisely.
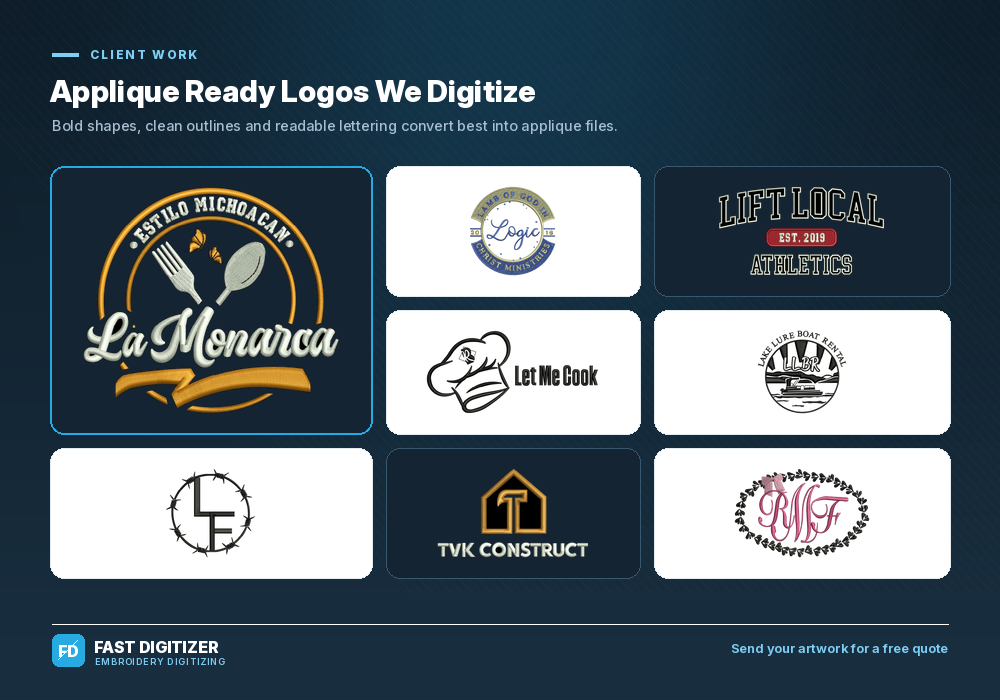
As a general rule, keep individual fabric shapes at least about 12 mm across at their narrowest point. Anything thinner is better digitized as a normal satin or fill element sitting on top of the applique. Similarly, reduce the number of separate fabric pieces wherever you can, since every extra piece adds another trim stop for the operator.
If you are unsure whether your artwork suits the method, send it over. Our team reviews the file first and tells you honestly which parts should stay as fabric and which should become thread. Vector artwork works best, and if you only have a photo or a screenshot, our guide on how to convert a JPG into an embroidery file explains what we need.
Common Applique Embroidery Mistakes to Avoid
Most applique failures trace back to four things: a missing placement line, a badly placed tack down, a rushed trim or the wrong stabilizer. Fortunately all four are easy to catch before production if you test sew one piece first.
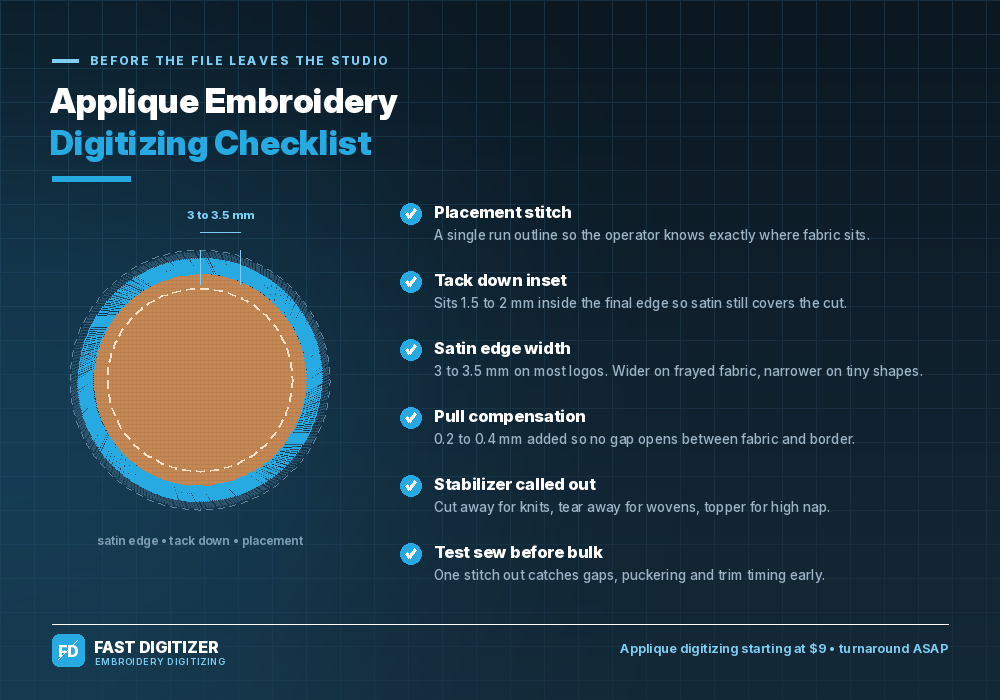
- Skipping the test sew. One stitch out reveals gaps, puckering and trim timing problems immediately.
- Trimming too far from the tack down. Loose fabric then peeks out from under the satin border.
- Over dense borders. Too much thread in the edge causes the garment to cup and pucker around the shape.
- Ignoring fabric stretch. A knit base needs cut away backing, otherwise the whole applique distorts after the first wash.
Above all, remember that a clean applique file depends on the digitizing, not the machine. The same care that goes into digitizing images for embroidery gives the operator clear stops, sensible sequencing and an edge that truly covers the fabric.
What Applique Digitizing Costs
Pricing depends on how many separate fabric pieces the design needs, the finished size and the garment it runs on. A simple one piece shape costs less than a layered three colour crest, because each extra piece adds another placement line, tack down and border.
At Fast Digitizer, applique digitizing starts at $9 and turnaround is ASAP. Every file arrives with the full stitch sequence built in, plus a production worksheet listing the fabric colours, the trim stops and the recommended stabilizer. If you need the same logo in several formats, our custom embroidery digitizing options cover that too.
Ready to stitch it out?
Send us your logo and we will tell you whether applique or a standard fill gives you the better result.
Frequently Asked Questions
What is the difference between embroidery and applique?
Embroidery builds the design out of thread alone. Applique builds it out of fabric pieces that stitching holds in place along the edge. Therefore applique covers large areas with far fewer stitches, while plain embroidery handles small detail and fine lettering better.
What are the three types of applique?
The three most common types are smooth edge, raw edge and reverse applique. Smooth edge uses a dense satin border to hide the cut edge completely. Raw edge leaves the fabric exposed for a softer look. Reverse applique places the fabric underneath and cuts the top layer away to reveal it. Fusible applique is often listed as a fourth type.
How do you do applique embroidery?
Hoop the garment with the correct stabilizer, then run the placement stitch. Lay your fabric over that outline and run the tack down. Next, trim the excess close to the stitch line with curved scissors. Finally, run the satin or zigzag border to seal the raw edge.
What fabric do you use for applique embroidery?
Cotton twill, poly twill, felt and denim are the usual choices because they cut cleanly and resist fraying. Felt does not fray at all, which makes it very forgiving for beginners. Avoid loose weaves and stretchy knits unless you back them with fusible web first.
About Fast Digitizer. We are an embroidery digitizing studio based in Chicago, producing applique, logo, cap and 3D puff files for embroiderers across the United States. Every file is manually digitized, tested and delivered with a production worksheet. Explore our full range of professional embroidery digitizing services or send your artwork for a free quote.